

10 hardy annuals for your zone 5 & 6 cutting garden that will press BEAUTIFULLY
My flower preservation practice wouldn't exist without my cutting garden. In fact, it was my unexpected love for growing cut flowers from seed that led me to change the course of my life, from a cog in the corporate world to a pressed flower artist.
There was a time when I thought gardening was a chore, a waste of time. That changed in 2018 when my young daughter brought home a zinnia seedling she had grown at school. It was a small, fateful gesture that meant more to me than she will ever know. Zinnias were my grandmother's favorite flowers. Her magnificent garden was the most beautiful in her neighborhood and my favorite place in the entire world to hide during long summer days, study bugs, and get my hands really dirty.
So in 2018, I decided to grow a few vegetables and flowers from seed in the only sunny area of our Chicagoland property: the front yard. I took flower-farming classes during the pandemic and gradually expanded my garden to several raised beds and containers.
Growing, tending, and pressing flowers from my garden is the most rewarding and nourishing thing I've ever done for myself. I want to share this joy with you through this guide to growing and pressing some of the most beautiful flowers I've ever grown.
These 10 flowers face cold springs like champs and press beautifully. They're forgiving of mistakes (everybody kills flowers, even experienced growers). Whether you're in Zone 5 or 6, these guidelines will get you started. But remember, they're guidelines! The best way to learn what works in your garden is to experiment.
If you have any questions, drop a comment below or reach out through my contact form - I’m happy to help!
Two more things…
Equipment: You will need a few items to get your seeds started. Check out this article I wrote about the equipment I use myself.
Know your zone: Not sure which zone you're in? Enter your zip code at the USDA Plant Hardiness Zone Map:
Zone 5: Last frost April 7–30 | First frost October 13–21
Zone 6: Last frost April 1–21 | First frost October 17–31
Ok, let's dig in!
1. Anemone
Also known as: Windflower
Pressability: ★★★☆☆ (Intermediate)
Why I love growing anemone
There's a reason everybody swoons over anemones. Those jewel-toned petals surrounding dramatic dark centers? Pure magic. And when you press them fresh from your garden, harvested that morning, they retain a vibrancy that store-bought flowers simply can't match.
Yes, they grow from corms instead of seeds, which means a slightly different process. But don't let that intimidate you! Once you get the hang of soaking and planting those funny little dried nuggets, you'll be rewarded with some of the most stunning pressed flowers in your collection.
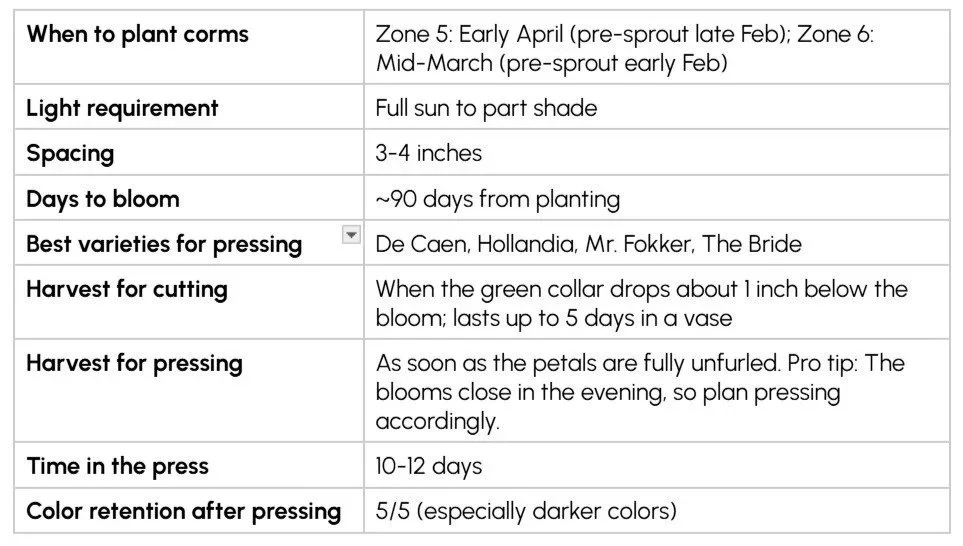
Anemone at a glance
How to sprout anemone corms
Anemones grow from corms, not seeds, which means a slightly different process. Here's how to get them started:
Soak corms in room-temperature water for 4-6 hours until they roughly double in size. Don't go longer than 8 hours or waterlogged corms can rot before they ever get going.
Plant in flat trays filled with moist potting mix, about 2 inches apart. Can't tell which end is up? You're not alone! Just plant them sideways, and they'll figure it out.
Keep them cool (40-50°F) for 2-3 weeks until green shoots appear.
Time your pre-sprouting based on your zone: Zone 5, start soaking in late February for early April transplanting. Zone 6, start in early February for mid-March transplanting.
They may need grow lights to reduce "legginess" (the shoots will stretch for light, making the seedling lanky and weak).
Transplant after your last hard frost, setting them 2-3 inches deep and 4-6 inches apart.
Water the seedlings with a nitrogen-based fertilizer (I like Neptune's Harvest) after transplanting and weekly until they start to take off.
Best varieties for pressing
Go with De Caen or St. Brigid types. De Caen has single rows of petals that press perfectly flat, with no overlap to worry about. St. Brigid varieties are ruffled and gorgeous, but the extra petals need more careful arrangement.
Color tip: Deep reds ('Hollandia') and rich purples ('Mr. Fokker') hold their color beautifully after pressing. White varieties ('The Bride') press clean but can brown if your timing's off.
Harvesting for the press
Here's the tricky part with anemones: the harvest window is narrow. You want petals fully unfurled, but before any pollen dust appears on those dark centers.
The good news? You'll develop an eye for it quickly. Look for completely flat petals (not cupped), a tight dark center, and no visible pollen. That window lasts about 12-24 hours per bloom. Harvest in the morning after the dew dries.
Don't forget to press...
The foliage! Those deeply divided, fernlike leaves press into delicate, lacy shapes that make gorgeous background elements. I harvest leaves from the base of the plant, and they press flat without any fuss.
Honestly, the buds aren't worth pressing. They compress into unremarkable little shapes. Save your pressing paper for the open blooms.
How the colors hold up
It depends on the color. Dark reds actually deepen slightly and retain about 80% of their intensity, with stunning results. Purples hold well but may shift a few shades toward blue. Whites stay clean if you dry them quickly.
The main color concern is those dramatic dark centers. They can bleed onto petals if you don't remove moisture quickly enough. Change your pressing paper after 2-3 days and you'll avoid most problems.
Watch out for...
The thick center holds water longer than those thin petals. If you don't address this, you get crispy petals around a moldy center, which is not the look we're going for! Solution: Change your paper after every 2 days until they are mostly dry.
St. Brigid varieties can trap moisture where petals overlap. For stubborn specimens, I sometimes separate petals and press them individually, then reassemble in the final artwork. More work, but worth it for those ruffled beauties.
2. Bachelor's Button
Also known as: Cornflower
Pressability: ★★★★★ (Beginner-Friendly)
Why I love growing Bachelor's Button
If you want reliable blue in your pressed flower art, this is your flower. I've pressed thousands of flowers over the years, and very few hold their blue the way bachelor's buttons do. Most blues fade to muddy gray or shift toward purple. Bachelor's buttons? They stay true.
They're also incredibly forgiving, both in the garden and in the press. Drought-tolerant, frost-hardy, and happy to reseed themselves. If you're new to growing flowers for pressing, start here. Seriously.
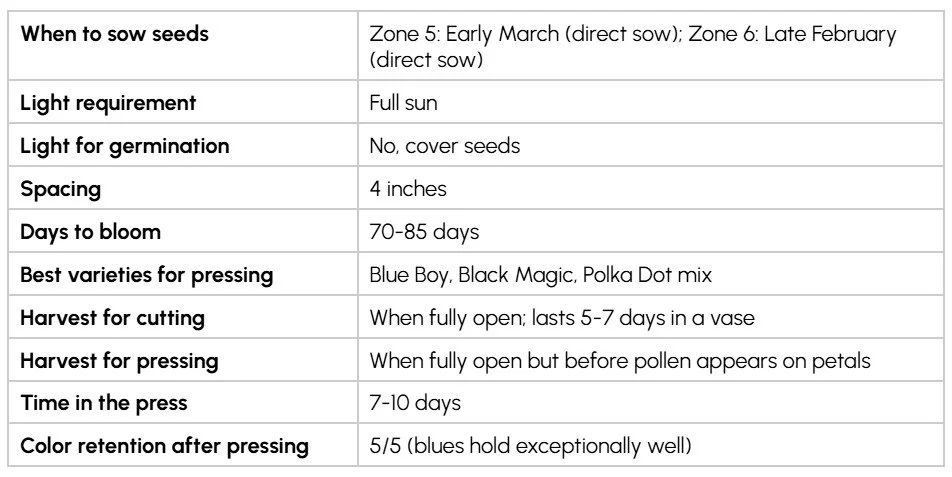
Bachelor's Button at a glance
How to grow bachelor's button
Bachelor's buttons are one of the easiest flowers to grow from seed, making them perfect for beginners.
Direct sow seeds outdoors in early spring, as soon as the soil can be worked. They actually prefer cool weather for germination.
Cover seeds lightly with about 1/4 inch of soil. They need darkness to germinate.
Keep soil moist until germination, which takes 7-14 days.
Thin seedlings to 4 inches apart once they have their first true leaves.
No fertilizer needed. They actually bloom better in poor to average soil.
For continuous blooms, succession plant every 2-3 weeks through mid-spring.
Best varieties for pressing
Blue Boy is the classic, with that saturated, true blue that's hard to beat. But don't overlook Black Magic (deep maroon, almost black when pressed) or the Polka Dot mix if you want variety.
Skip the double varieties. Those overlapping petals trap moisture and don't press as cleanly. Stick with singles for pressing.
Harvesting for the press
Bachelor's button gives you a generous harvest window of 2-3 days, which is practically an eternity compared to more finicky flowers. Even slightly past-prime blooms press well, just with a more "vintage" look as outer petals reflex. No panic required with these!
Don't forget to press...
The silvery-green foliage is totally underrated. Those slender, lance-shaped leaves press flat with zero effort and add beautiful linear texture to arrangements.
Buds work surprisingly well too. They press into tight, silvery spheres, perfect for filling small gaps in designs.
How the colors hold up
Excellent, among the best of any flower. Blue varieties maintain about 90% of their color intensity even after a year in a frame. This is genuinely rare!
Pinks and whites hold well, too. The reds (like Black Magic) can shift slightly toward burgundy over time, but they stay rich and beautiful.
Watch out for...
The only real issue is the center, which holds moisture longer than the petals. If you press before it's fully dry, you'll get browning in the middle while the petals look perfect.
Easy fix: press face-down so the center gets air circulation, and change your pressing paper after 2-3 days.
3. Calendula
Also known as: Pot Marigold
Pressability: ★★★★☆ (Beginner-Friendly)
Why I love growing calendula
Calendula is pure sunshine in flower form. Those bright orange and yellow petals practically glow, bringing warmth and cheer to any pressed arrangement. And from a growing perspective? Almost foolproof.
They germinate fast (often within a week!), tolerate poor soil, bloom continuously if you deadhead, and self-sow enthusiastically. Plus, they handle light frost without complaint, which extends your growing and harvesting window on both ends of the season. What's not to love?
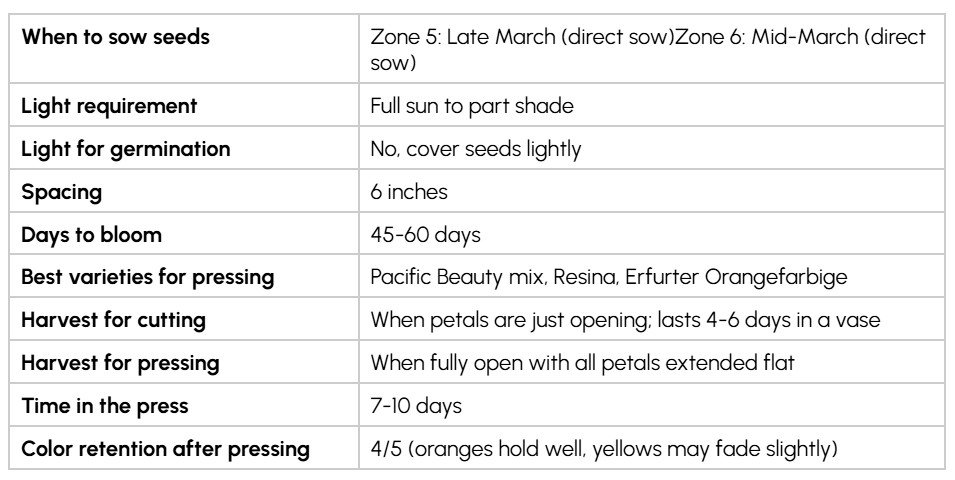
Calendula at a glance
How to grow calendula
Calendula is wonderfully straightforward and one of the fastest flowers from seed to bloom.
Direct sow seeds outdoors after the last hard frost, or start indoors 4-6 weeks earlier.
Cover seeds with 1/4 inch of soil. They germinate best in darkness.
Germination is fast, often within 5-7 days in warm soil.
Thin seedlings to 6 inches apart.
Water regularly but avoid overhead watering, which can promote powdery mildew.
Deadhead spent blooms to encourage continuous flowering.
They struggle in the summer heat. Expect a pause in blooming during the hottest weeks, then a fall resurgence.
Best varieties for pressing
Pacific Beauty mix offers a lovely range of oranges, yellows, and apricots with nice, long stems. Resina and Erfurter Orangefarbige are high-resin varieties grown for medicinal use, but their intense orange color makes them fantastic for pressing too.
Double varieties create fuller pressed flowers but need more attention during drying. Singles are more predictable if you're just starting out.
Harvesting for the press
For pressing, wait until flowers are fully open, with all petals extended and flat. This happens about 1-2 days after the bloom first opens. Different timing than for fresh arrangements!
Calendula opens and closes with the sun, so harvest mid-morning after flowers have opened but before the afternoon heat. If the center is doming up and showing seeds, you've waited too long.
Don't forget to press...
Here's a fun trick: the petals detach easily from the center. Some pressers prefer to separate them, press flat, and reassemble into custom configurations. More flexibility for your designs!
The immature buds press into fun, tight spirals with a silvery-green color. The sticky leaves? Skip those, as they can discolor your paper.
How the colors hold up
Good to excellent! Oranges hold that warm, sunny glow for months. Yellows are slightly more prone to fading toward cream over time, but still stay reasonably vibrant.
The key is fast initial drying. Calendula petals contain natural oils that can cause yellowing if moisture gets trapped. Change your paper after 2-3 days.
Watch out for...
Like other daisy-family flowers, that thick central disc holds water longer than the thin petals. This can cause browning where petals meet the center. Press face-down and change paper frequently.
For doubles with multiple petal layers, moisture can get trapped between layers. Either remove the outer layer or allow extra drying time.
4. Feverfew
Also known as: Wild Chamomile, Matricaria
Pressability: ★★★★☆ (Beginner-Friendly)
Why I love growing feverfew
Every pressed arrangement needs filler flowers, and feverfew is one of the best. Those clusters of small daisy-like blooms add texture, lightness, and visual breathing room between larger flowers. Without good filler, pressed arrangements look crowded and heavy.
Once established, feverfew is remarkably self-sufficient. It's a short-lived perennial that reseeds happily and will sprout throughout your garden. You'll have it forever, which is either wonderful or terrifying, depending on how you feel about volunteer plants!
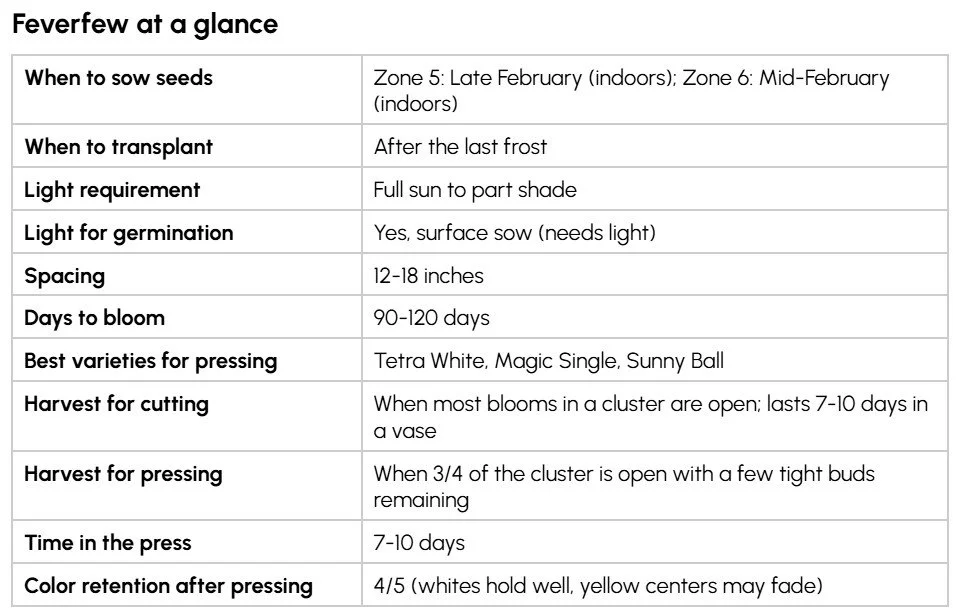
Feverfew at a glance
How to grow feverfew
Feverfew requires a bit of patience since it's slow to start, but once established it's practically carefree.
Start seeds indoors 8-10 weeks before your last frost date.
Surface sow seeds. They need light to germinate, so don't cover them.
Keep soil moist and warm (65-70°F). Germination takes 10-14 days.
Transplant seedlings outdoors after all danger of frost has passed.
Space plants 12-18 inches apart. They'll bush out considerably.
Water regularly until established, then they're quite drought-tolerant.
Pinch back young plants to encourage bushier growth and more blooms.
Best varieties for pressing
'Tetra White' has fully double white flowers with minimal yellow centers, perfect for pressing. 'Magic Single' offers the classic daisy form. 'Sunny Ball' is unusual, all yellow, providing warm-toned filler.
Harvesting for the press
Harvest when flower clusters are about three-quarters open. You want most blooms in the spray open with a few tight buds remaining. Yellow centers should be fresh and bright, not browning.
Cut entire stems rather than individual flowers since the branching sprays are part of feverfew's charm. But work quickly! The small flowers wilt faster than you'd expect.
Don't forget to press...
That ferny, aromatic foliage presses beautifully and adds wonderful lacy texture. The distinctive scent disappears once dried, so no worries about weird-smelling art!
Immature flower buds, those tight green spheres before white petals emerge, create interesting textural elements. They press into perfect tiny dots.
How the colors hold up
White petals maintain their brightness well. Yellow centers can fade to cream over time, but it usually happens gradually enough not to be noticeable. Double varieties like 'Tetra White' minimize the center anyway.
If you're seeing browning, it's almost always a moisture problem from the centers, not actual color degradation.
Watch out for...
Yellow centers hold moisture longer than thin petals. Change paper after 2-3 days, and consider pressing face-down.
Feverfew wilts quickly once cut. Have your press ready before harvesting, and work in batches small enough to press within 30 minutes of cutting.
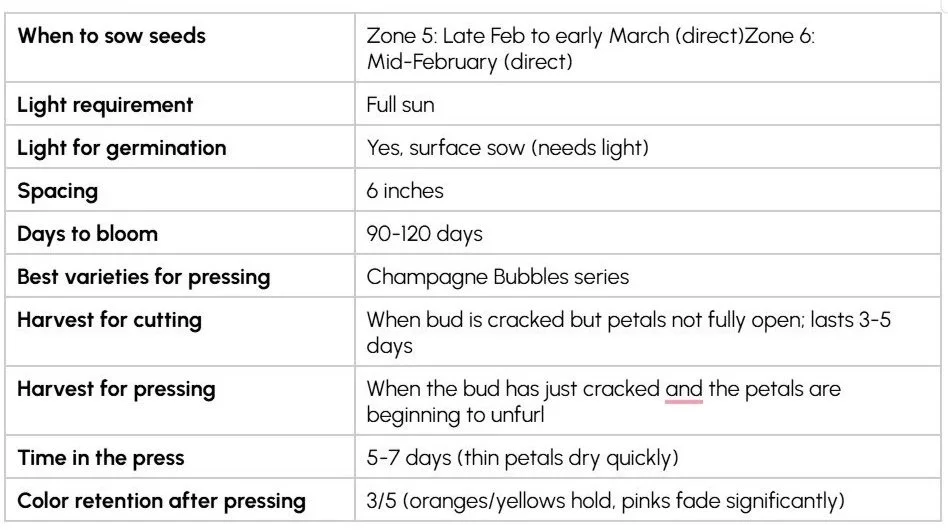
5. Iceland Poppy
Pressability: ★★☆☆☆ (Advanced)
Why I love growing Iceland poppy
Iceland poppies press into something almost impossibly delicate: tissue-paper petals so thin they become translucent, with beautiful dark veining visible through the surface. When everything aligns, the results look like watercolor paintings.
I won't lie to you: they're finicky. They require precise timing, careful handling, and quick pressing. But for patient growers willing to master the learning curve, the rewards are extraordinary.
Iceland Poppy at a glance
How to grow Iceland poppy
Iceland poppies prefer cool weather and can be tricky in areas with hot summers. The key is getting them established early.
Direct sow seeds in late winter or very early spring. They need cold to germinate well.
Surface sow seeds and press gently. They need light to germinate.
Keep soil consistently moist. Germination takes 10-21 days and can be erratic.
Do not thin. Iceland poppies actually perform better when slightly crowded.
They hate being transplanted, so direct sowing is strongly preferred.
Mulch around plants to keep roots cool as temperatures warm.
They may go dormant in summer heat, then rebloom in fall.
Best varieties for pressing
Champagne Bubbles series offers lovely soft pastels (peach, pink, yellow, cream) that press with romantic, watercolor quality.
Orange and yellow varieties hold their color better than pinks, which can fade toward cream. Something to consider when planning your garden.
Harvesting for the press
Here's the tricky part: the petals are so delicate they start dropping by the time the flower looks fully open. For pressing, harvest when the bud has just cracked open and petals are unfurling.
Watch for the protective green cap (calyx) splitting and beginning to fall away. Once you see this, you have roughly 12-24 hours before full bloom and petal drop. It's a narrow window!
Don't forget to press...
The hairy stems and buds have great character. The distinctive seed pods that form after flowering are architectural and unusual. The blue-green, deeply lobed foliage presses easily.
Lots of pressing options from one plant if you're willing to experiment!
How the colors hold up
Variable. Oranges and yellows maintain reasonable vibrancy. Reds shift toward brick or rust. Pinks fade most noticeably, often becoming cream or nearly white. Whites, paradoxically, hold well!
The translucent quality means pressed poppies always appear lighter than fresh flowers, regardless of color. That's just the nature of the beast.
Watch out for...
Those tissue-thin petals tear easily when wet or handled roughly. Let flowers dry slightly (15-30 minutes) before pressing, and never touch the petals. Handle by the stem only.
The prominent seed pod in the center doesn't press well. Carefully remove it by sliding it out from behind the petals before arranging for the press.
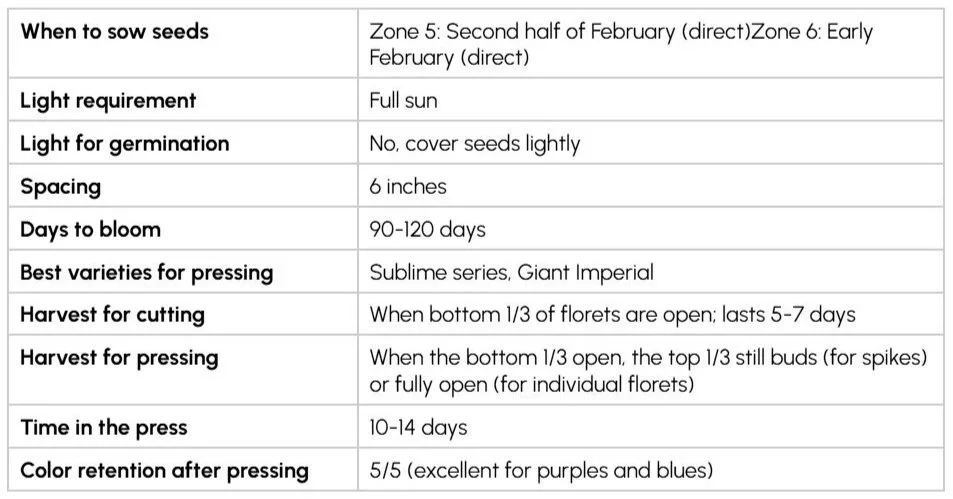
6. Larkspur
Pressability: ★★★★☆ (Beginner-Friendly)
Why I love growing larkspur
Every pressed arrangement needs some vertical interest, and larkspur delivers it beautifully. Those tall spikes covered in butterfly-like florets create movement and draw the eye upward. No more flat, predictable designs!
The purples and blues are especially valuable, since true purple is one of the hardest colors to achieve in pressed flowers, and larkspur reliably gives it to you. The pinks and whites are equally lovely for different color palettes.
Larkspur at a glance
How to grow larkspur
Larkspur needs cold to germinate and should be one of the first seeds you sow each year. Don't wait for warm weather!
Direct sow seeds outdoors in late winter, even if snow is still possible. They need cold stratification.
Cover seeds lightly with 1/8 inch of soil.
Alternatively, refrigerate seeds for 2 weeks before sowing to simulate winter.
Germination takes 14-21 days and requires cool temperatures (55-65°F).
Thin seedlings to 6 inches apart once they have several true leaves.
Stake tall varieties or plant in groups so they can support each other.
They resent transplanting, so direct sowing is strongly preferred.
Best varieties for pressing
The Sublime series is my top choice, with double flowers in gorgeous colors and strong stems. Giant Imperial is another excellent option with fully double blooms.
'Sublime Blue' and 'Sublime Lilac' provide those hard-to-find purple-blue tones. 'Sublime White' is pristine but shows any browning easily.
Harvesting for the press
For whole spikes, harvest when the bottom third of florets are open, and the top third are still buds. This gives you a mix of textures. For individual florets, wait until they're fully open.
The hollow stems are filled with milky sap, so let them sit for a few minutes before pressing to prevent staining.
Don't forget to press...
Larkspur foliage is fernlike and delicate, pressing into beautiful lacy shapes. Harvest leaves from lower on the stem where they're fully developed.
The seed pods that form after flowering are architectural, with small clusters of pointed pods that make unusual graphic elements.
How the colors hold up
Excellent for purples and blues, among the best color retention of any flower in these shades! Pinks can fade toward dusty rose, but this often reads as a pleasing antique quality.
Get moisture out fast. Change paper after 2-3 days and again after another 2-3 days.
Watch out for...
That milky sap can migrate to the petals if you press immediately. Let the cut stems dry for 10-15 minutes first.
Florets may detach during handling. Press gently and accept that some loss is normal, or press individual florets for more control.
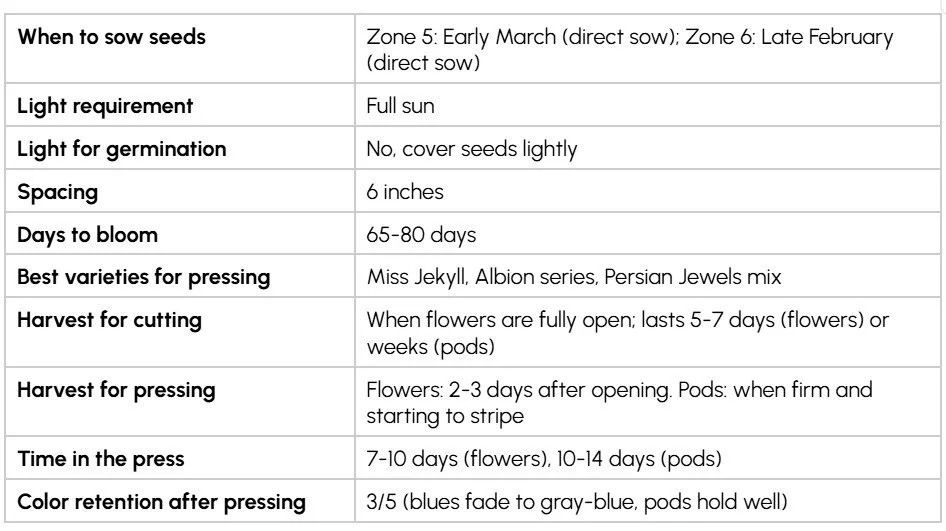
7. Nigella
Also known as: Love-in-a-Mist
Pressability: ★★★★☆ (Beginner-Friendly)
Why I love growing nigella
Nigella proves whimsy belongs in pressed art. Those delicate blooms surrounded by feathery bracts (the "mist") create an ethereal, romantic quality that nothing else matches. And then the seed pods, those striped, architectural globes, offer something completely different later in the season.
Essentially, you get two distinct pressing elements from one plant: soft romantic flowers early, structured, fun pods later. Both are beautiful. And the plants practically grow themselves! If you leave the pods to dry out completely, nigella will reseed and come back the following year.
Nigella at a glance
How to grow nigella
Nigella is one of the most carefree annuals you can grow. Direct sow and mostly ignore it!
Direct sow seeds outdoors in early spring. They tolerate light frost.
Cover seeds lightly with 1/8 inch of soil.
Germination takes 10-14 days in cool soil.
Thin seedlings to 6 inches apart, or leave slightly crowded for a fuller look.
No staking needed. No fertilizer needed. Minimal water once established.
For continuous blooms, succession plant every 3 weeks through mid-spring.
Let some pods dry on the plant to collect seeds or allow self-sowing for next year.
Best varieties for pressing
'Miss Jekyll' is the classic, with semi-double sky-blue flowers and that romantic cottage-garden character. 'Albion' series offers white and pastels. 'Persian Jewels' mix gives you blue, purple, pink, and white.
Harvesting for the press
For flowers: harvest when fully open but still fresh (2-3 days after opening). Cut whole stems to include those feathery bracts.
For seed pods: wait until fully developed and starting to turn from green to tan or striped. They should feel firm and dry, not soft.
Don't forget to press...
The feathery foliage is actually the star for pressing! Those wispy, needle-like leaves create an incredibly fine texture. Use them to fill spaces, add airiness, or create beds for other flowers to rest on.
Don't overlook the seed pods. They press into striking graphic elements. Use them for texture, pattern, or focal points.
How the colors hold up
Blue varieties fade toward gray-blue over time, but this often reads as a pleasant antique quality rather than a flaw. Whites and pastels hold well. Pinks fade more noticeably.
Seed pods don't fade, and their striped patterns remain distinct.
Watch out for...
The puffy central part can stay thick and trap moisture even when the petals are dry. Press face-down for air circulation and change paper after 2-3 days.
Those feathery bracts can tangle and look messy if not carefully arranged. Take time to separate and flatten them before closing your press.
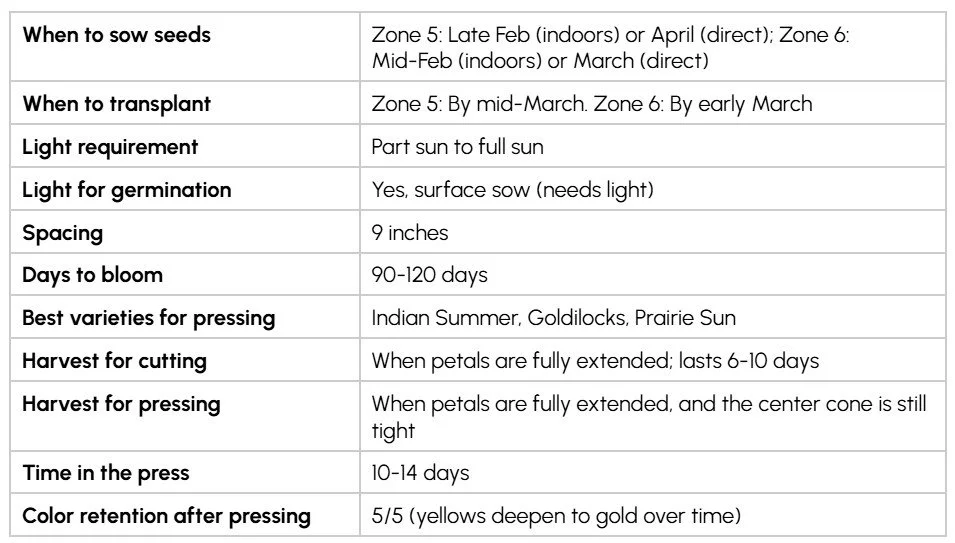
8. Rudbeckia
Also known as: Black-Eyed Susan
Pressability: ★★★★☆ (Beginner-Friendly)
Why I love growing rudbeckia
Rudbeckia is pure garden joy. Those golden-yellow petals around dark chocolate centers are instantly recognizable and universally beloved. They're the flower equivalent of sunshine: bright, cheerful, impossible not to smile at.
From a practical standpoint, they're drought-tolerant, pest-resistant, and bloom for months with regular harvesting. The sturdy petals handle well without tearing. Solid choice for pressing beginners!
Rudbeckia at a glance
How to grow rudbeckia
Rudbeckia is tough and adaptable, tolerating heat, drought, and poor soil once established.
Start seeds indoors 6-8 weeks before the last frost, or direct sow after soil warms.
Surface sow seeds. They need light to germinate.
Keep soil moist and warm (70-75°F). Germination takes 7-14 days.
Transplant seedlings outdoors after the last frost, spacing 9 inches apart.
Water regularly until established, then they're quite drought-tolerant.
Deadhead spent blooms to encourage continuous flowering.
No staking needed for most varieties. No fertilizer needed.
Best varieties for pressing
'Indian Summer' produces large, golden yellow flowers that are impressive for pressing. 'Goldilocks' offers double and semi-double options. 'Prairie Sun' has unusual green centers instead of the classic dark cone.
'Indian Summer' is my recommendation, with substantial petals that hold up well to handling.
Harvesting for the press
Harvest when petals are fully extended, and the dark center cone is still tight. If the center is elongating or showing seeds, you've waited too long.
Unlike delicate flowers, rudbeckia holds well in water for several hours, giving you nice flexibility if you can't press immediately.
Don't forget to press...
The rough, hairy leaves look tired and brown when pressed, so skip them. But immature green buds press into interesting dome shapes.
The dark center cones, pressed separately from petals, create dramatic textural elements.
How the colors hold up
Excellent for yellow petals, which maintain that warm, sunny glow for months. Dark center cones hold their color indefinitely.
Over time, yellow may deepen to gold rather than fade to cream.
Watch out for...
That prominent dark center holds water and can stain petals. Press face-down for air circulation and change paper after 2-3 days.
For very large varieties, the center may be too thick to press flat. Consider pressing it separately.
9. Snapdragon
Pressability: ★★★☆☆ (Intermediate)
Why I love growing snapdragons
Snapdragons give you incredible efficiency: one stem yields dozens of individual florets, each a perfect little botanical specimen. For building a pressed flower inventory, nothing beats them.
The color range is exceptional: white through yellow, orange, pink, red, and burgundy so dark it's nearly black. And unlike many flowers, snapdragon colors tend to hold reasonably well after pressing. Bonus: If you leave some pods to dry completely, snapdragons will reseed for next year.
Snapdragon at a glance
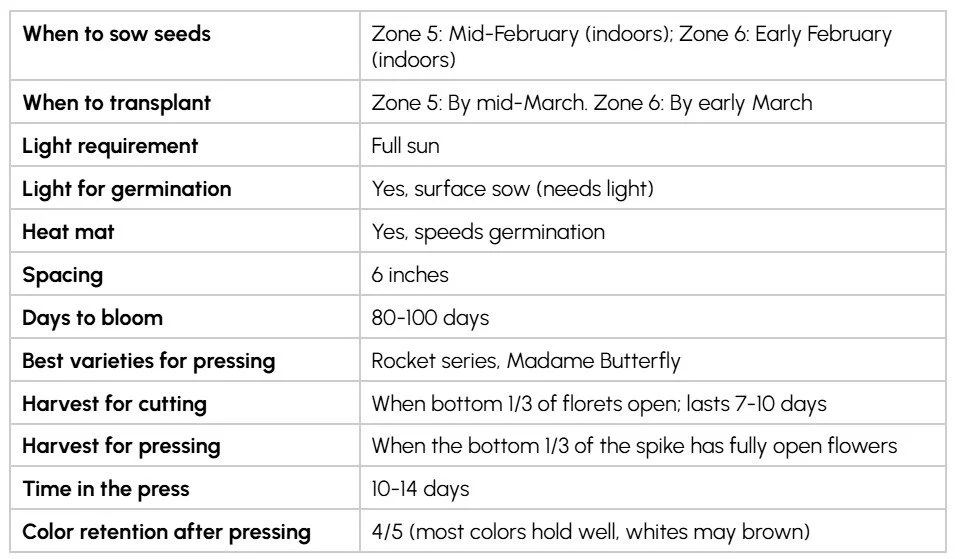
How to grow snapdragon
Snapdragons need an early start indoors but are otherwise easy to grow. They prefer cool weather and may struggle in intense summer heat.
Start seeds indoors 8-10 weeks before the last frost. They're slow to get going!
Surface sow seeds. They need light to germinate.
Use a heat mat to maintain 65-75°F. Germination takes 14-21 days.
Pinch seedlings when 3-4 inches tall to encourage branching and more blooms.
Transplant outdoors after the last frost, spacing 6 inches apart.
Stake tall varieties or use support netting.
Cut spent spikes to encourage a second flush of blooms.
Best varieties for pressing
'Rocket' series produces tall, sturdy stems with classic snap form. 'Madame Butterfly' (also sold as 'Butterfly') has double, azalea-like open faces that press more easily.
Harvesting for the press
For individual florets, harvest when the bottom third of the spike has fully open flowers. This gives you florets at various stages.
For whole-spike pressing (challenging but possible), harvest when about half the florets are open.
Don't forget to press...
Don't overlook the unopened buds at the top of each spike. They press into charming pointed shapes with hints of color.
The leaves are unremarkable, just small, dark green, nothing special. Focus on the flowers.
How the colors hold up
Good to very good across most colors. Reds and oranges hold particularly well. Yellows stay bright. Pinks fade toward dusty rose but remain attractive. Deep burgundy may shift slightly but stays rich.
White varieties brown if moisture isn't removed quickly, so pay extra attention to paper changes.
Watch out for...
That classic "dragon mouth" shape doesn't press flat naturally. Your options: split florets lengthwise for two flat pieces, or press 'Madame Butterfly' types, which are naturally open.
The thick back portion (calyx and stem attachment) holds moisture. Remove it before pressing, or be prepared for browning there.
10. Sweet Pea
Pressability: ★★★☆☆ (Intermediate)
Why I love growing sweet pea
Sweet peas are romance distilled into a flower. Those ruffled, butterfly-like blooms with their intoxicating fragrance capture something magical about spring gardens. Pressed, they retain that ethereal quality: delicate, airy, glowing with soft color. And the fragrance is absolutely intoxicating!
They're deeply connected to wedding traditions, making them particularly meaningful for bridal preservation. A bride who carried sweet peas will treasure seeing them preserved forever.
Sweet Pea at a glance

How to grow sweet pea
Sweet peas need cool weather and should be started as early as possible. They stop blooming once the summer heat arrives.
Soak seeds overnight or nick the seed coat with a file to speed germination.
Start indoors in deep pots (root trainers work well) 6-8 weeks before the last frost, or direct sow in early spring.
Plant seeds 1 inch deep. They don't need light to germinate.
Germination takes 10-14 days in cool soil (55-65°F).
Install trellis or netting before transplanting. They need support immediately!
Transplant seedlings 12 inches apart at the base of your support structure.
Pinch out growing tips when plants are 6 inches tall to encourage branching.
Pick flowers frequently. If they form seed pods, flowering stops.
Best varieties for pressing
Spencer series and 'High Scent' offer classic ruffled form and powerful fragrance. For pressing, solid colors are more predictable than bicolors, which can shift unpredictably.
Pale colors (white, cream, soft pink, lavender) press most predictably. Deep reds and purples can shift toward muddy tones.
Harvesting for the press
For pressing, harvest when fully open but freshly so. Petals should be turgid, with no wilt at the edges. Sweet peas decline rapidly, so press immediately.
Cut frequently (every 1-2 days) to keep plants producing. If they form seed pods, flowering stops. And if you're ever tempted to snack on the pods because they look like snap peas, don't! They are not edible.
Don't forget to press...
The curling tendrils are charmingly pressed, creating spirals that add whimsy and movement. Handle gently!
Leaves are unremarkable, but the winged stems with their flat, ribbon-like edges are texturally interesting.
How the colors hold up
This is sweet peas' weakness. Colors fade significantly during pressing and continue fading over time. White and cream hold best. Pale pinks become near-white. Deep reds and purples often turn muddy brown.
To maximize retention: harvest at peak freshness, press within 30 minutes, use quality pressing paper, and change frequently. Even with perfect technique, expect some loss.
Watch out for...
Color fading is the primary challenge. Accept that pressed sweet peas will be paler than fresh ones, and choose varieties accordingly.
Ruffled petals can stick together during pressing. Carefully arrange each petal before closing the press.
Where I get my seeds
My go-to sources are Johnny's Selected Seeds, Eden Brothers, Burpee's, Baker Creek, and Floret. I've had the best germination rates with Baker Creek, but they carry a more limited range of cut flowers. Most of my seeds these days come from Johnny's and Eden Brothers.
Whatever source you choose, look for varieties bred for cutting rather than bedding. The stems will be longer, the flowers larger, and you'll have much more to work with when it's time to press.
Happy growing, pressing, and keeping!